
Architecture:
mp2 Barcoding Plus uses a middleware server called mp2 Mobile Products Server to send transaction data to mp2. mp2 Barcoding Plus clients communicate with the server via a TCP/IP connection. As a result, you only need one instance of the mp2 Mobile Products server in your environment. We recommend that this server be installed on the mp2 database server.

The mp2 Mobile Products server can be run on Windows XP, Vista, 7, 8, 8.1 or Server 2003, 2008 (R1/R2) and 2012. The server requires very little resources to function, less than 50mb disk space and 1GB RAM.
Installing MP2 Mobile Products Server
The MP2 Mobile Products Server application is installed using a self-extracting zip file and a batch script. Follow these steps to install the MP2 Mobile Products Server. On Windows 7 or Server 2008, execute all .exe and .bat files as Administrator.
- Start the installation by double-clicking MP2 Mobile Products.exe. The installer will extract files and launch setup.bat. Press any key to continue.

-
The installer will ask if you want MP2 Mobile Products Server to start
automatically when the computer starts or manually started by the user. The MP2 Mobile Products Server runs
as a service allowing the application to start and handle client request without needing a user to log in and
start the server. Enter Y for auto start and N for manual start.
-
Enter 1 to install mp2 Barcoding Plus. If you plan on using Barcoding Plus and Pocket mp2 Plus now or in the future, enter 3

-
Press any key to complete the install.
Creating ODBC (DSN) Connection to MP2
The mp2 Mobile Products server uses its own ODBC data source and cannot use the same data source as mp2. Please do not skip this step.
- Open ODBC Data Source Administrator
- 32-bit OS: Start - Control Panel - Administrative Tools - Data Sources (ODBC)
- 64-bit OS: Start - run and enter C:\Windows\SysWOW64\odbcad32.exe
- Select the System DSN tab. Then click Add... button
- Select the SQL Server driver and click Finish
- Enter barcoding in the name field (Description is optional)
-
Enter the mp2 server name an instance in the server field and select Next. Example: (local)\mp2

Your SQL Server instance name may be different or you may be using the default instance, in which case you'll just need to enter (local)
- Select With SQL Server authentication radio button and enter a Login ID and Password of a SQL user that has access to the MP2 database. Click Next.

- Select Change the default database to and select the MP2 database from the list. Click Next.
- Select Change the language of SQL Server system messages to and select English. Click Finish.
- Test the data source, if successful, click OK and exit the tool.
Configuring MP2 Mobile Products Server
mp2 Mobile Products Server consist of two executable files, the Service and Integration Manager (aka configuration utility).
To open the MP2 Mobile Products Server Integration Manager, double click the MP2 Mobile Products Server Integration manager icon on the toolbar.
Or run C:\Program Files\MP2 Mobile Products\mp2MobileServiceManager.exe
Important: The MP2 Mobile Products Server Integration manager must be run as Administrator. Failure to do this will result in unsaved configurations.
- If the manager is already running, right-click and select Exit.
- Browse to C:\Program Files\MP2 Mobile Products\ right click on mp2MobileServiceManager.exe and select 'Run as Administrator'
Add application map
- Select OBDC Client SQL from the Connection Services drop-down menu.
- Enter BARCODINGPLUS in the Application ID field.
- Click Add Map.

Configure Connection Services
- Select Connection Services tab - ODBC Client SQL tab
- Enter the barcoding for the data source name and a SQL user and password (this is the same user and password you entered when creating the ODBC data source).
- Click Test.
If the test fails, verify the ODBC data source configuration and SQL user ID and password (both user id and password are case-sensitive)

Configuring Queuing Services
- Select Queuing Services tab.
- Select and delete both targets that start with Access

- Select the first SQL_Ora target and click Edit.
- Enter the same data source information as above and click OK
- Repeat steps for the second SQL_Ora target.


Installing MP2 Barcoding Plus Client on your Mobile Device
If devices were ordered through Infor/Blue Dot Solutions, they will arrive preloaded with mp2 Barcoding Plus application and this section can be skipped.
If not, please install mp2 Barcoding Plus as outlined below.
In order to copy the files from the desktop to the mobile device, you’ll have to have Windows Mobile Device Center installed on your PC.
Windows Mobile device Center:
- Windows Vista, 7, 8 & 8.1 64-bit: https://www.microsoft.com/en-us/download/details.aspx?id=3182
- Windows Vista, 7, 8 & 8.1 32-bit: https://www.microsoft.com/en-us/download/details.aspx?id=14
- Windows XP (Active Sync): https://www.microsoft.com/en-us/download/details.aspx?id=15
Once installed, connect the device's cradle to your PC and place the device in the cradle. Windows Mobile Device Center should start and bring you to a connected screen. If it does not, try rebooting your PC. After the reboot is complete, start Windows Mobile Device Center (Start - Programs) and cradle your device.
Only one device can be connected to a PC at a time.
- Open Windows Explorer and go to the c:\Program Files\mp2 Mobile Products\Client\mp2 Barcoding Plus\ subdirectory under the MP2 Mobile Products Server. Right click on the mp2BarcodingPlus.CAB file and select “Copy”.

-
Select “My Pocket PC” and in the left panel, right click and choose “Paste”. This will copy the file from the desktop to the mobile device.
Depending on the device and OS, the device may be named differently. However, it will show up as a drive or device in "My Computer"

- After the file has completed copying, open the devices File Explorer from the Programs menu on the Mobile Device, and go to the mobile devices root directory, and click on the mp2BarcodingPlus.CAB file. This will start the installation process.

- Once the installation is completed, you have successfully installed MP2 Barcoding Plus on the mobile device.
Setting Up the MP2 Barcoding Plus Client
After installing the MP2 Barcoding Plus Client application, some setup is required. Please follow the steps below to complete the setup process for the MP2 Barcoding Plus Client.
-
Start mp2 Barcoding Plus on the device, select Start - Programs - mp2 Barcoding Plus
The first time the application is started you may be prompted for an auth key. Please email the authorization key to support@bluedotsolutions.com for your authorization code. Include your Name, contact information, and Company Name. Once you receive this, you will be able to complete your configuration of MP2 Barcoding Plus.
- The Login dialog is displayed. Log in as the administrator with a User ID of admin and a password of 12345
- Select Utilities - Data Connection and enter the IP Address if the server were mp2 Mobile Products is installed.
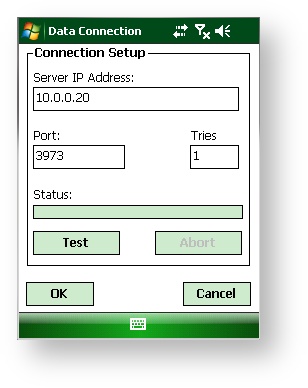
-
Select the test button.
If the test fails, check the following.
1. Make sure you have a network connection. This can be provided by a wireless network or Windows Mobile Device Center via a cradle connected to your PC.
2. Double check the IP address of the server.
3. Make sure Windows Firewall is either disabled on the server or a allow rule has been added for port 3973 - Tap OK to save the setting.
- On the Utilities menu, tap Setup - Database Version and select the type of mp2 database you're using. Tap OK
- If mp2 is Single Site, Warehouse, location and/or Purchasing Center. Tap the corresponding button to enter the default ID. For example, if mp2 is configured for a single site. Select Site - Single Site and enter the Site ID.
- Tap Done to complete the setup and return to the main menu.
- Tap Upload. This will pull mp2 user and security information to the device.
- Tap Utilities - Change Login and log in as an mp2 user.
The setup is now complete, repeat these steps for any extra devices that you may have.
Testing mp2 Barcoding Plus
Once the setup is complete, you are ready to run a few test transactions through mp2 Barcoding Plus. The following procedure will test that data is flowing from the device to mp2.
- Login to mp2 Barcoding Plus as an mp2 user.
- Tap Physical Inventory
- Enter a few physical inventory transactions. You do not need to use real part data since this is only a test and will not be applied to mp2.
- Tap Done to return to the main menu.
- Tap Upload to send the test data to mp2.
- Once the upload as completed, it will take about 2 minutes for your transactions to show up in mp2.
- Open mp2 on your PC and go to Activities - Barcode - Transactions.
- Select the Physical Inventory tab.
- You should see the test transaction that you entered on the device. If you do not, please contact support@bluedotsolutions.com
- Delete each test transaction by selecting the transaction and clicking the - button in the mp2 toolbar.

Comments
0 comments
Please sign in to leave a comment.